Showing posts with label Cupcakes. Show all posts

Sunday, September 26, 2021

Use Low GI Sugar to make Peanut Butter Cupcakes | Behind the scene 低升糖花...


Peanut Butter Cupcakes


花生酱杯子蛋糕


* No Mixer 无需搅拌机

* Soft & Fluffy 松软可口

* Use Low GI Sugar 用低升糖赤砂糖


Recently I like to use Low GI Sugar for my bakes. As it can yield the same result as caster sugar (except for bread making). I used Crunchy Peanut Butter, you can use creamy type too.

Behind the scene: I did IG giveaway recently, purpose is to give back, at the same time enjoy the process of giving and making. I also feel less stressful to give away then to sell my goods, this is also my way of slow Living. 


最近我喜欢用低升糖赤砂糖在烘焙上,主要是它可白砂糖一样可取得蓬松的效果(除了面包)。至于花生酱,我用的是粗颗粒花生酱,你也可用无颗粒花生酱。


幕后花絮:最近在IG分享中秋节送礼活动,主要是回馈和享受制作和送礼的过程。送出自制的食物,对我来说也未尝不是一种慢活的态度。


Yield 6 Cupcakes 

可制成6份杯子蛋糕


Peanut Butter Cupcakes

花生酱杯子蛋糕

@FoodiEat随食慢活

(Recipe adapted from Here) 


Wet Ingredients 湿性材料

1 Medium Egg 中型鸡蛋 

70g Low GI Sugar 低升糖赤砂糖

1/2 tsp vanilla essence 香草精

100g Milk 牛奶

25g Peanut Butter 花生酱

40g Cooking Oil 米糠油(或其他无味食用油)


Dry Ingredients 干性材料

1/2 tsp Baking Powder 泡打粉

1/4 tsp Baking Soda 小苏打

160g All Purpose Flour 普通面粉


Method:

Beat sugar and egg till foamy 

Add other wet ingredients gradually 

Mix and sift all dry ingredients 

Combine wet and dry ingredients 

(Optional) Add Chocolate Chips 

add Grounded Peanut or Peanut Powder for extra crunch

Bake in 170 degree preheated oven for 35 minutes 


打发鸡蛋与砂糖至微微起泡

逐步加其他湿性材料

过筛和混合干性材料

混合干性与湿性材料

随个人喜欢加巧克力粒

我喜欢外层有脆度,所以加上花生粉在表层

放入170度预热烤箱烤35分钟


Video with English Subtitle 记得开启字幕,Turn on CC For subtitles For full method, see video: https://youtu.be/pR5se59S0mU 完整做法,请看影片:https://youtu.be/pR5se59S0mU For written recipe: http://foodplayground.blogspot.com/2021 文字食谱:http://foodplayground.blogspot.com/2021 记得订阅: https://www.youtube.com/channel/UCgCOHfPwLDi74RYBpuyNVHg?sub_confirmation=1 To SUBSCRIBE, go to : https://www.youtube.com/channel/UCgCOHfPwLDi74RYBpuyNVHg?sub_confirmation=1 我的日常生活 Follow me on : Facebook: https://www.facebook.com/foodieatplayground Instagram: https://www.instagram.com/foodieatplayground Want to see more recipes? Check out: http://foodplayground.blogspot.com/ 关于合作事项可电邮联系 | Business/DM for collab: Email: foodplayground@gmail.com 你或许有兴趣 (Popular Playists): 【简单健康食谱 Healthy RECIPES】- https://youtube.com/playlist?list=PLi0IEmHC2ayB2H1nwV570ZzFWxIh2bGGM 【简单蛋糕食谱 Easy Cake RECIPES】- https://youtube.com/playlist?list=PLi0IEmHC2ayD80kdZ2zVYYa3ooj_IOl1H 【甜品料理食谱 Dessert RECIPES】- https://youtube.com/playlist?list=PLi0IEmHC2ayAhn2CMCeN4M61m94iCYAXe 【饭锅料理食谱 Rice Cooker RECIPES】 - https://youtube.com/playlist?list=PLi0IEmHC2ayCi8ZNH-Yur_-AwUJaWu_so 【早餐料理食谱 Breakfast RECIPES】- https://youtube.com/playlist?list=PLi0IEmHC2ayC8o6TEFGEhTV_juZcQhFcg 【开箱分享 Unboxing & Review 】- https://youtube.com/playlist?list=PLi0IEmHC2ayAM40k5wTqcnIQStsjnsJp6 ❤️想看到更多关于新加坡美食、地点和旅游影片的话,记得订阅,留言、按赞、分享。订阅无需花你一份钱,但却会给我多一份动力去制作更多影片。你的举手之劳是我的一臂之力。希望你可以不吝啬地给我一点鼓励。谢谢❤️ If you like this video, appreciate if you can subscribe, like, share and comment to my channel. It doesn’t cost you a cent but it gives me the opportunity to show you more videos. Do press bell for latest notification once you subscribed. Thank you for watching! To subscribe: https://www.youtube.com/channel/UCgCOHfPwLDi74RYBpuyNVHg?sub_confirmation=1


Wednesday, November 4, 2020

【Easy Cake RECIPE】Low Sugar Matcha Honey Cupcakes| No Shrink | Less Oil|...


Announcement: 大家好!”随食慢活FoodiEat”,将是“玩食我Foodie At Playground”频道的新名称。 请熟悉这频道名字和logo好吗?同样由我执行,内容不变。 Hi everyone! “玩食我Foodie At Playground” channel will be replaced by this new name and logo:”随食慢活FoodiEat” !By same creator, same content. 不便之处,请见谅。Sorry for inconvenience caused. 下方链接依旧 Below link remain unchanged: Facebook: https://www.facebook.com/foodieatplayground Instagram: https://www.instagram.com/foodieatplayground Want to see more recipes? Check out: http://foodplayground.blogspot.com/


【Easy Cake RECIPE】Low Sugar Matcha Honey Cupcakes| No Shrink | Less Oil|❤️ 蜜糖抹茶杯子蛋糕|不回缩|低糖低油


if you like moist and dense cake you will like this! 喜欢扎实又湿润的蛋糕吗?那你会喜欢这一味!


* Low sugar & Oil 低糖低油

* Will not Shrink 不回缩

* With Probiotic 含乳酸菌


蜜糖抹茶杯子蛋糕 Matcha Honey Cupcakes Recipe by 随食慢活FoodiEat

(adapted recipe: here)

Ingredients材料:

1 egg 鸡蛋

20g caster sugar 细砂糖

120g Self Raising Flour 自发粉

1 tsp matcha powder 抹茶粉

3 tbsp plain yogurt 原味优格

1 tbsp honey 蜜糖

1 tbsp cooking oil (I used grapeseed oil) 食用油(我用葡萄籽油)

2 tbsp milk (I used skimmed milk) 牛奶 (我用脱脂牛奶)


Method 做法:

1. Beat Egg and sugar, can use hand mixer or electric mixer to beat 糖与鸡蛋混合,可用手动或电动搅拌器

2. Add remaining ingredients 加其他材料

3. add sifted flour in 3 parts 分3次加粉类

4. fill 70% if you prefer lower cake (I filled to 90%) 如不想蛋糕发得太高,可盛约7成(我盛至9成)

5. tap to release air bubbles 震几下去除气泡

6. bake in 180 degrees preheated oven for 25-30 min 放进180度预热烤箱约25-30分钟


(Video with English Subtitle) For full method, see video: https://youtu.be/qmuMa6ghNb8 完整做法,请看影片:https://youtu.be/qmuMa6ghNb8 For written recipe: http://foodplayground.blogspot.com/2020 文字食谱:http://foodplayground.blogspot.com/2020 想看更多健康简单食谱, 记得在此订阅并按铃铛就不会错过最新影片: https://www.youtube.com/channel/UCgCOHfPwLDi74RYBpuyNVHg?sub_confirmation=1 To see latest video, please SUBSCRIBE below, and press Notification : https://www.youtube.com/channel/UCgCOHfPwLDi74RYBpuyNVHg?sub_confirmation=1


Wednesday, June 17, 2020

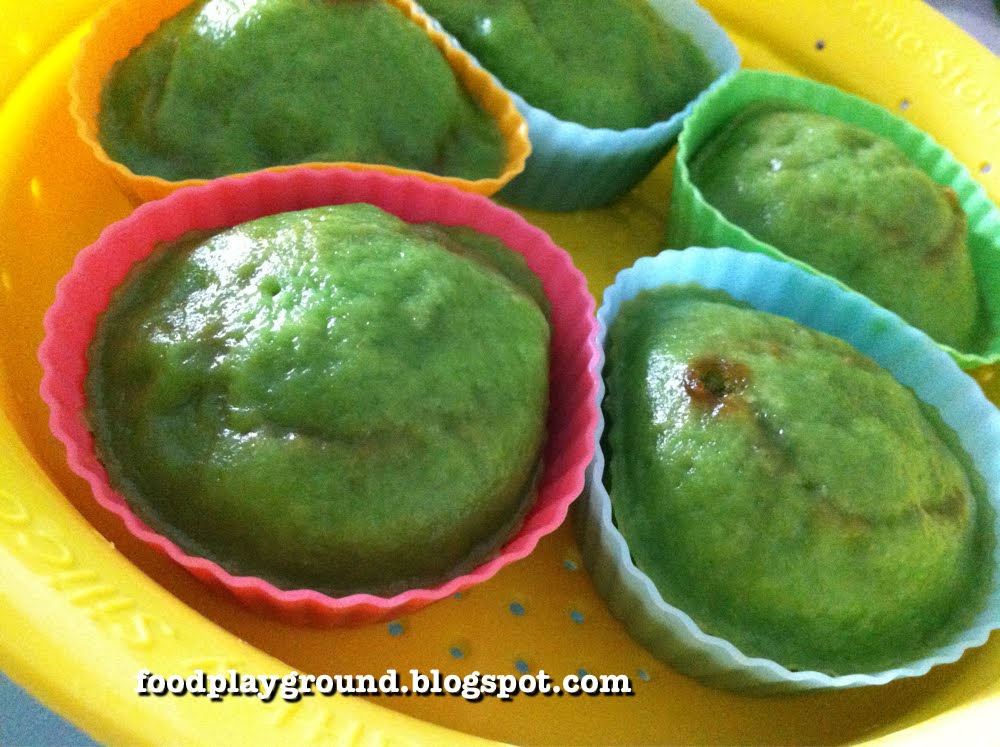
【Easy Cupcake RECIPE】Pandan Mochi Cupcake | Crisp, Chewy & Less Sweet | ...


【Easy Cake RECIPE】Pandan Mochi Cake | Chewy & Less Sweet | ❤️ 班兰椰香麻薯杯子蛋糕 |软Q少甜|懒人食谱

For full method, see video: https://youtu.be/2A0w-0NVBC4 完整做法,请看影片:https://youtu.be/2A0w-0NVBC4 For written recipe: https://foodplayground.blogspot.com 参照食谱:https://foodplayground.blogspot.com/ (Video with English Subtitle) 记得订阅: https://www.youtube.com/channel/UCgCOHfPwLDi74RYBpuyNVHg?sub_confirmation=1 To SUBSCRIBE, go to : https://www.youtube.com/channel/UCgCOHfPwLDi74RYBpuyNVHg?sub_confirmation=1
These cute mushroom shape Pandan Mochi Cupcakes, Crisp outside, soft & chewy inside with melt in your mouth chocolate filling. Most importantly, easy & less sweet.

这班兰椰香麻薯杯子蛋糕做法简单,外酥内软Q,也不过甜,巧克力内馅也提升了口感-入口即化。

Yield 9 mushroom shape mochi cupcakes 可制成9个蘑菇头麻薯蛋糕

Ingredients 材料:
A:
90gm Glutinous Rice Flour
90克糯米粉
1/2 tsp baking powder
1/2茶匙泡打粉
A pinch of salt
小撮盐
Mix well (set aside)
搅拌均匀(备用)

B:
1 egg
1个鸡蛋
27gm cooking oil
27克食用油
40gm caster sugar
40克砂糖
Mix well (set aside)
搅拌均匀(备用)
65gm Coconut Milk
65克椰奶
1/4 tsp Pandan extract
1/4茶匙班兰精油
Mix wet ingredients to dry ingredients
干性与湿性材料混合

1. Brush moulds with oil(for non-stick purpose) 给模具刷上一层油(方便脱模)
2. Pour mixture to moulds(half fill first)倒入粉浆(先倒一半)
3. Drop some chocolate chips 加点巧克力片
4. Fill to 90% full 倒至九分满
5. Bake in preheated oven - Set 180 deg 40 minutes 放入预热烤箱,180度烤40分钟

Thursday, April 25, 2013

Japanese Green Tea Cheesecake


I love all kinds of Cheesecake, be it NY cheesecake or Japanese cheesecake. Today I'm meeting a old friend that I know for 20 years! Time flies... To give her a surprise, I decided to make her Japanese Green Tea Cheesecake.

Still have One more week before the closing date of AB #30: it's Tea time! , means this is also an opportunity and push factor for me to think of what to bake with tea.

I used this recipe from Vivian pang kitchen and this technique from the little teochew as reference :

(A)
125g cream cheese (I left with 110g cream cheese)
90ml milk
15g butter

(B)
30g flour (I used top flour)
24g corn flour
1 tsp green tea powder
3 egg yolks

(C)
3 egg whites
1 tsp lime juice (I used cream of tartar)
75g Caster sugar (I cut down to 65g)

Method:
1. Place cream cheese, milk and butter in a bowl. Cook with double boiler method until thick and smooth. Set aside.

2. After the cheese mixture turned warm, mix in both flours and green tea powder mixture(sifted). Stir with a whisk until smooth.

3. Add egg yolks into the cheese mixture and stir until well combined.

4. In another clean bowl, beat egg whites and cream of tartar until frothy. Add in sugar gradually, beat until stiff peak.

5. Fold 1/4 of egg whites into cheese mixture, and then another 1/4 of egg whites. Lastly the rest of egg whites. Make sure all the egg whites is well combined with the cheese mixture.

6. fill each cup 3/4 full and Steam bake at 150°C for 50 mins or until skewer comes out completely dry.

7. I leave the cake in the oven for 30 min with oven door slightly open. So that the cakes will not collapse too quickly due to the sudden change of temperature.

8. allow it to cool completely before you eat.

I am submitting this post to Aspiring Bakers #30: It's Tea Time!(Apr 2013) hosted By Food playground.


Monday, November 26, 2012

Easy Hokkaido Cupcakes


Hokkaido Cupcakes are very popular now, because the texture is light and cottony.
Initially I thought it is hard to bake, so I grabbed the opportunity to learn at The Baking Studio. After the 2 hours workshop, I realized it is actually very easy to make, and now I know why it's called Hokkaido Cupcake. You want to know the answer?

Actually this cupcake is originally from Malaysia. Why Hokkaido? As this cupcake has cream filling and icing sugar topping, it signified ice mountain in Hokkaido.

To date, this is my third batch and always successful. This recipe is definitely a keeper.

Ingredients:
(A)
3 Egg Yolk
20g Sugar
Pitch of salt
35g Canola Oil or Corn oil
60g Skimmed Milk or Full Cream Milk (room temperature)

(B)
3 Egg White
1/4 tsp cream of Tartar
40g caster sugar

70g Cake Flour or Top Flour

(Topping/filling)
100g Whip Cream
Icing sugar

Method:
1. Preheat oven at 180 degree.
2. Combine A in a bowl. Mix well.
3. Whisk B till soft peak.
4. Sift cake flour into A mixture. Mix well.
5. Add 20% B to egg yolk mixture, fold well.
6. Pour egg yolk mixture to remaining egg white mixture. Fold well.
7. Pour batter into paper cups, 3/4 full.
8. Bake for 20-30 minutes till surface golden brown.
9. Cool the cakes.
10. Whisk cream and pipe into cakes. Sprinkle with icing sugar.


Saturday, November 24, 2012

Steam Pandan Cupcakes with Palm Sugar


I have never steamed any cake in my entire life. Reason being: I always hear my mom said it is hard to steam a "笑"(top raise and open)steam cake. That is why it take me so long to steam any cake. This month, I finally pick up the courage, I tell myself: I must try at least once.

Last week, I steamed my first cake. It was, as expected, a failure. The cake didn't raise, and sink in at the centre. Guessed the main reason is I open the cover to check with a skewer, it did not come clear, so I let it steam for another 15 minutes, and the more I checked the worst it looked.

This time, I read more posts on how to steam cake, and pick up tips here and there. As usual, I modified to a simpler version. The recipe that I followed mainly from HERE.

Although this time, the cakes did not "笑", but they are all cooked. Texture is soft and spongy. I am quite happy with the result.

Ingredient: (make 5 cupcakes)
120g Self Raising Flour
50g sugar
100g hot water
1/2 tsp pandan paste
1/2 tsp baking powder
20g canola oil
1 egg
Some palm sugar

Method:
1. Add sugar to hot water. Stir to melt sugar. Let cool.
2. Add pandan paste to sugar water, stir well.
3. Sift flour and baking powder in a mixing bowl.
4. Add sugar mixture, oil and sieved beaten egg.
5. Mix till all incorporated.
6. Fill each cup 1/3 full, sprinkle some palm sugar, and top up to 3/4 full.
7. Steam over medium heat for 45 minutes.
8. Let cool and serve.

I am submitting this post to Aspiring Bakers #25 - Steaming Hot Cakes (November 2012) hosted by Miss B of Everybody Eats Well in Flanders.

Tuesday, July 17, 2012

Discover a link in fb

Discovered this from www.facebook.com/ilovepeelfresh.sg today.

I Love Peel Fresh SG shared a link.
June 6
If anyone's into baking, you'll be surprised that MARIGOLD PEEL FRESH Yuzu juice can be of help. Foodplayground has come up with a lovely recipe for Yuzu cupcakes!

Food Playground: Lemon Yuzu Cupcakes
foodplayground.blogspot.com
8 like this.

Thanks for sharing the link!

Thursday, March 29, 2012

Easy Pandan Cupcakes


I like the texture of my earlier no fail red velvet Cake. So thought maybe I can adopt this recipe to make pandan cake. Instead of vanilla essence and red coloring, I replaced with pandan paste. Result: it surprised me with kaya aftertaste, not sure why... The texture was like the red velvet cake, soft and fluffy.

Ingredients: (make 5 cupcakes)
60g unsalted butter, room temperature (I used Margarine)
150gm caster sugar (I used 90-100gm)
1 egg
1/2 tsp pandan paste
120ml buttermilk (I used 100ml low fat milk with 1/2 tsp White vinegar, rest for 5 min or more)
1 & 1/2 tsp white vinegar
160gm plain flour (I used top flour, sifted)
1/2 tsp salt (I omitted as I use margarine and not unsalted butter)
1/2 tsp baking soda

Method:
1. Preheat oven to 170 deg C.
2. Whisk margarine and sugar till slightly pale, creamy and light.
3. Add egg in and mix well.
4. In a separate bowl, mix together pandan paste and some milk.
5. Add to butter mixture and mix evenly and well colored.
6. Add remaining milk and alternate with top flour. Mix till everything well incorporated.
7. Add baking soda and vinegar(and salt if you use unsalted butter), continue to stir till well mixed.
8. Fill each cup 3/4 full and bake in preheated oven for 25-30min.
9. Check if skewer inserted in centre come out clear. Once clear, remove from oven and cool on rack.

I am submitting this post to Very good recipes

Tuesday, February 21, 2012

No Fail Red Velvet Cupcakes - 1st attempt


Remembered the first time I had red velvet cupcakes, I thought it was made of cherry (by looking at the colour). From then on, I would choose the red velvet one whenever there were assortment of cupcakes in front of me.
Only recently when I wanted to make some for myself then I realized they are made of chocolate powder and red coloring. I was so wrong. Haha!
I was looking for easy to make and use only 1-2 eggs recipe and this is what I tried. I must say this is a no fail recipe, even though I use whisk instead of electric mixer and I mixed up some steps, the end result was still promising and satisfying-- fluffy and cottony and I liked it!
(below method is my version, see here for original recipe)

Ingredients: (make 7 cupcakes)
60g unsalted butter, room temperature (I used Margarine)
150gm caster sugar (I used 90-100gm)
1 egg
10g cocoa powder
20ml red coloring
1/2 tsp vanilla essence
120ml buttermilk (I used 100ml low fat milk with 1/2 tsp White vinegar, rest for 5 min or more)
1 & 1/2 tsp white vinegar
150gm plain flour (I used cake flour, sifted)
1/2 tsp salt (I omitted as I use margarine and not unsalted butter)
1/2 tsp baking soda

Method:
1. Preheat oven to 170 deg C.
2. Whisk margarine and sugar till slightly pale, creamy and light.
3. Add egg in and mix well.
4. In a separate bowl, mix together cocoa powder, red coloring, vanilla essence and some milk. Whisk till well mixed and no lumps.
5. Add to butter mixture and mix evenly and well colored.
6. Add remaining milk and alternate with cake flour. Mix till everything well incorporated.
7. Add baking soda and vinegar(and salt if you use unsalted butter), continue to stir till well mixed.
8. Fill each cup 3/4 full and bake in preheated oven for 25-30min.
9. Check if skewer inserted in centre come out clear. Once clear, remove from oven and cool on rack.

I am submitting this post to very good recipes-My valentine challenge.

Monday, December 19, 2011

X'mas Orange Yogurt Cupcakes


Wanted to get my mom a X'mas present. Since she likes orange colour and likes to eat orange cake, I decided to make her orange cupcakes. As X'mas is around the corner, I need to look for a easy and fast to make, no mixer required orange cake recipe. Among all that I have searched, this Martha stewart's recipe post is one that fits my requirement:

Ingredients: (make 15 small cupcakes)
1 cup all purpose flour(I used 1/3 cup top flour + 2/3 cup cake flour)
1/2 cup 2 tsp caster sugar (I only used 1/2 cup)
1/2 tsp baking powder
1/8 tsp baking soda
Pinch of salt
1/2 cup plain yogurt (equivalent to 1 cup of Meiji low fat plain yogurt)
1/4 cup vegetable oil
Zest and juice from 1/2 orange
1 large egg
1/2 tsp vanilla essence

1 orange (segmented)
Icing sugar for dusting

Method:
1. Preheat oven to 175 deg C.
2. Sift flour, sugar, baking powder, baking soda and salt. Set aside.
3. Pour yogurt, oil, egg, vanilla essence, orange zest and juice in a bowl. Stir well with a whisk.
4. Add sifted dry ingredients gradually till well mixed.
5. Fill each cup 3/4 full. Top with orange segment.
6. Bake for 25 minutes, till skewer comes out clean.
7. Let cool on wire rack.
8. Dust cupcakes with icing sugar.

Verdict: this recipe is good for beginner like me. It did not fail me although it was my first attempt. I modified a little if you compared. I like the soft and moist texture. Will definitely bake this again next time. Hope my mom likes it too.

Although it's not very creative, but it's christmasy. Therefore I have submitted this post to Aspiring bakers: #14: Christmas creative bakes(dec 2011) hosted by hankerie and White Christmas by very good recipes.

Tuesday, November 29, 2011

Easy Chocolate Cupcakes


That day my friend craved for chocolate cakes(due to PMS) but I was not. After a week, my turn to crave for chocolate cakes. So I searched around for easy to make chocolate cake that no need to use electric mixer(because I'm lazy, ha!) and this is the recipe I followed(I used half of the ingredients):

(adopted from Martha Stewart recipe)

Ingredients:(make 15 small cupcakes)
1/3 cup (36g) unsweetened cocoa powder
3/4 cup (82.5g) all purpose flour (I used cake flour)
3/4 cups icing sugar (I used 1/2 cups=60g)
3/4 tsp baking soda
1/3 tsp baking powder
1/3 tsp salt
1 egg
1/3 cup (80g) warm water
1/3 cup buttermilk (I used low fat milk + 1 tsp white vinegar)
1 1/2 tbs safflower oil( I used vegetable oil)
1/2 tsp pure vanilla extract (I used vanilla essence)

Method:
1. Preheat oven at 175 degree C.
2. Sift all dry ingredients: cocoa powder, flour, sugar, salt, baking soda and baking powder in a big bowl.
3. Add egg, warm water, milk, oil and vanilla essence, mix well and stir till smooth, about 3 minutes.
4. Pour mixture in piping bag and fill cup 3/4 full.
4. Bake for 20 minutes, till tops spring back when touched.
5. Transfer to a wire rack , let cool completely.

Verdict: I like it not too sweet and the heavenly chocolate aroma, it really reminds me of awfully chocolate cake. It definitely fulfilled my craving and I am happy now. ;)

P.S: no frosting for me, so I added some almond slices as decoration and give some crunch.

Not sure if this recipe passed this month Aspiring Bakers: enjoy cupcakes! Criteria, I still try and submit this post to Aspiring Bakers #13: Enjoy Cupcakes! (November 2011) hosted by Min of Min's Blog.

Saturday, November 26, 2011

Lemon Yuzu Cupcakes


Recently I bought a packet of Marigold Peel Fresh Yuzu juice. And thinking I can substitute lemon juice with Yuzu juice (both are from citrus fruits) if i am baking lemon cupcakes. So I adopted recipe from 爱丝特 and modified from there:

Ingredients: (make 15 small cupcakes)
100g margarine
60g caster sugar
2 eggs
120g top flour
1/2 tsp baking powder
Pinch of salt
1/2 potion of lemon peel (fine chopped)
1/2 tbsp +1/2 tsp Yuzu juice

Method:
1. Beat margarine till smooth.
2. Add half potion of sugar each time, till mixture turn slightly pale.
3. Add egg, pour 1/4 potion each time till mix well.
4. Add sifted top flour, baking powder and salt. Use spatula to mix well.
5. Add lemon peel and Yuzu juice, mix well.
6. Fill 3/4 cup full and put in preheated oven at 160 degree, bake for 20 minutes.
7. Cool on rack and ready to serve.

I go less with sugar(adopted recipe use 100g), and substitute with 1/2 tsp more Yuzu juice(adopted recipe only use 1 tbsp of juice), in hope of "borrow" the sweetness from the juice.
I like the fluffy texture! Also each bite With lemon peel bits. Yuzu juice does give a hint of yuzu flavour to the cake, and it complimented the lemon peel bits and gave out a nice citrus aroma.

I have contributed this post to Aspiring Bakers #13: Enjoy Cupcakes! (November 2011) hosted by Min of Min's Blog.

Friday, November 18, 2011

Fruit Tea Cupcakes


After baking banana cupcakes, i have more confidence in baking more cupcakes, and try out new recipes, this time i adopted recipe from 爱丝特 and modified from there:

Ingredients: (make 15 small cupcakes)
2 Fruit tea teabags
30g low fat milk
1 egg
50g Caster sugar
50g vegetable oil
100g top flour
1 tsp baking powder

Method:
1. Remove tea leaves from teabags. Soak tea leaves in milk for 10 minutes or more.
2. Beat egg and sugar till smooth and slightly pale.
3. Add milk with tea leaves and mix well.
4. Add sifted top flour and baking powder, mix well.
5. Add vegetable oil and mixed well.
6. Fill each cup 3/4 full. Put in preheated oven at 160 degree for 20 minutes.
7. Cool on rack and ready to serve.

I used fruit tea instead of Earl grey tea as I have a box of fruit tea teabag in my kitchen cabinet that's still not opened. And also this is my first time using tea in cupcakes, I want to see how well it turned out. Surprisingly, it turned out quite well, very spongy and has very nice berry aroma. I don't like to add frosting on top as i find frosting too sweet, so I sprinkled some mixed seeds instead.

I have contributed this post to Aspiring Bakers #13: Enjoy Cupcakes! (November 2011) hosted by Min of Min's Blog.

Thursday, November 17, 2011

Banana Cupcakes


Before baking these banana cupcakes, I actually encountered a few failure, either the top part was too hard or the centre part sunken in. Thanks to this month aspiring bakers theme: enjoy cupcakes! I give myself more reason to challenge cupcakes. And thanks to min(the host for this theme)and her encouragement, I give myself target to come out with at least 1 good entry to participate.

This time I adopted recipe from abbymonster and replicated from there:

Ingredients: (make 10 cupcakes)
100g top flour
1 tsp baking powder
1 egg
60g caster sugar
1 banana (equivalent to 120-130g)
60g vegetable oil
30ml low fat milk
1/8 tsp salt
Chocolate chip for decoration

Method:
1. Use fork to mash banana.
2. Sift top flour and baking powder.
3. Beat egg and sugar till smooth and slightly pale.
4. Add mashed banana, milk and salt, mix well.
5. Add sifted flour and baking powder, mix well.
6. Add vegetable oil and stir well.
7. Fill each cup 3/4 full. Top with chocolate chips.
8. Put in preheated oven at 180 degree and bake for 20 minutes.
9. Cool on rack and ready to serve.

These cupcakes turned out well! soft texture and nice banana flavour! It gives me confidence to bake some more cupcakes! thanks to abbymonster's reliable recipe!

I have contributed this post to Aspiring Bakers #13: Enjoy Cupcakes! (November 2011) hosted by Min of Min's Blog.